Showing posts with label Recipe Box. Show all posts

Tuesday, June 26, 2012

Loving summer salads

One of the things I love most about summer is cooking with garden fresh veggies and herbs. While my veggies are still growing, my herbs are mostly coming in well and are ready for plucking. Let the season of mojitos begin! 


The other night I made a delicious Thai Grilled Steak Salad that was featured on The Kitchn. It was a hit and I want to share the recipe. 


Thai Grilled Steak Salad
Makes 4 servings
1 1/2 pounds rib eye steak
1/4 cup lime juice
1/4 cup fish sauce
1/2 teaspoon sugar
1 small head lettuce
1/2 cup mint leaves
1/2 cup cilantro leaves
1 cucumber, thinly sliced
1/2 pint cherry tomatoes, halved
1/4 red onion, thinly sliced
Salt
Vegetable oil
• Feel free to add 1 or 2 minced chilies (Thai bird's eye or serrano) to the dressing if you want some heat.


Season the steak with salt and set aside. Heat a gas or charcoal grill or grill pan over high heat until very hot. Brush the steak with oil and grill to desired doneness, about 4-5 minutes per side for medium-rare. Transfer to a cutting board and let rest for at least 5 minutes.
Meanwhile, in a small bowl, whisk together the lime juice, fish sauce and sugar.
Tear the lettuce into bite-sized pieces and place in a large mixing bowl. Roughly tear the mint and cilantro and add to the bowl. Add the cucumber, tomatoes and red onion.
Trim away any excess fat from the steak and thinly slice across the grain. Pour the accumulated juices into the lime-fish sauce dressing and mix. Drizzle 4 tablespoons of dressing over the lettuce mixture and toss. Taste a lettuce leaf and add more dressing if needed. Divide the salad between four plates and top each serving with the sliced steak. Drizzle a little more dressing over the steak before serving. (There will most likely be some dressing left over.)
Additional Notes:

Sunday, June 3, 2012

Turtles and Raspberry Lemon Bars

Yes, the title of this post does have a meaning. And yes, they do go together. You'll see.

So, a couple weeks ago I hosted a baby shower for my friend Kelly. At the shower, I served these, what I thought were (and yes, ahem, I did make them) amazing raspberry lemonade bars. (Much thanks to the blog Annie's Eats, from where I stole this delicious recipe! And, if you like to follow recipe blogs like me... Ok, I'm a little addicted, it may be a disease... Well, anyway, Annie's Eats is a great one to follow. I highly recommend her.)

So, if you're to lazy to CLICK above, here's the raspberry lemonade bar recipe. Yum. Yum. (I didn't take a photo of mine, so just click on over to Annie's Eats to see a photo that will certainly entice you to make these little beauties).

Raspberry Lemonade Bars

INGREDIENTS
For the crust:

  • 2¼ sticks (18 tbsp.) unsalted butter, at room temperature
  • ½ cup sugar
  • 2 cups all-purpose flour
  • ½ tsp. salt
For the raspberry lemon layer:
  • 3 cups sugar
  • 1 1/3 cups all-purpose flour
  • 3 tbsp. lemon zest
  • ¼ tsp. salt
  • 3 cups frozen raspberries, thawed
  • 6 large egg whites
  • 2 large eggs
  • 1 1/3 cups freshly squeezed lemon juice
  • Confectioners’ sugar, for dusting

DIRECTIONS
Preheat the oven to 350˚ F.  Line a 9 x 13-inch baking pan with parchment paper.  In the bowl of an electric mixer, combine the butter and sugar.  Beat on medium-high speed until smooth, 1-2 minutes.  With the mixer on low speed, mix in the flour and salt just until incorporated.  Add the dough to the prepared baking pan.  Press into an even layer over the bottom of the pan.  Bake for about 25 minutes or until light golden brown.  Remove from the oven, maintaining the temperature.

While the crust is baking, make the top layer.  Combine the sugar, flour, lemon zest and salt in a large bowl and whisk to blend.  Add the raspberries to a fine mesh sieve and press through, mashing with a spatula, to extract as much juice and pulp as possible, straining out the seeds.  Add the egg whites and eggs to the bowl with the dry ingredients and whisk well to blend.  Whisk in the raspberry puree and lemon juice until smooth.

Pour the mixture over the crust and bake until the center is just set and not longer jiggles when gently shaken, about 35-40 minutes.  Transfer to a wire rack to cool to room temperature.  Cover and chill well in the refrigerator, at least 2 hours.  When ready to serve, use the parchment paper to lift the bars from the pan.  Place on a cutting board and slice into bars.  Dust the tops with confectioners’ sugar if desired.

*This recipe can be halved and baked in an 8 x 8-inch baking pan with a slightly reduced baking time.

Ok, so now that you're all hungry and mad at me for making you crave sugar, (Ooh, I feel like I'm beginning to sound like a food blogger... except I don't come up with my own recipes, I just share other peoples... not quite the same...)... On to THE TURTLE.

I've come to call snapping turtles my nemesis. Why you may ask?

Well, innocently enough (ok not so innocently, Kelly's husband captured the beast), Kelly had a snapping turtle in a bucket... So, we put water over it and left in the driveway... because, what else do you do with a large reptile that has just arrived at your home, right?

So, how did he become my nemesis?

 Well, this particular snapping turtle ESCAPED.

BTW, did you know that they look like this?


Imagine that ugly beats running around your neighborhood... TAUNTING YOU. Trying to bite your toes off. Ok, so I'm exaggerating a bit. But that bugger SCARED THE BEGEBEES out of me! Look how ugly that guy is. And, I swear, the one that ended up in my driveway was EVEN UGLIER! 

Mainly, I was worried about my dog. I didn't want her to get snapped at. Fortunately, she didn't. He was gone from 1 p.m. to 7 p.m., whereupon he came lunging up my driveway at me as I was leaving for a friend's party that evening. And, I know it's a turtle. I know they are slow. But the hare stood no chance against this monster. He could really MOVE. Kelly said they'd come get him, but I knew by the time that they'd arrive he'd be gone. 

So, I don't see him at all the next day... or the next day.... Then, Tuesday morning rolls around... And. He. Returns! 

I was out walking Lucy for our morning walk. We went down around the pond near my house as usual (see where this is going?) and on the way ran into my neighbor who lives across the street. Who starts to tell me about how his wife went to let out the dog on Sunday... and you can guess what they ran into. Needless to say, I apologized profusely if it scared his wife or dog (hey the dang thing scared me!) and confessed I knew where he came from. Of course, my neighbor just laughed at me because I was so worked up over a silly turtle!

So, Lucy and I continue and do a second loop and she walks over to the woodchips on the playground and THERE IT WAS! Just bathing in the sun. So, completely freaked out and feeling guilty and feeling like the turtle needs to find an appropriate home, I called New Brighton Parks and Recreation as soon as they opened to inform them about the turtle. (And I called back at noon. They hadn't been able to find him. I don't know if they ever did.) Anyway, it's been a couple week and it's gone. 

My conclusion. He trotted across the overpass, over the interstate and made his way to Long Lake Park, where he is now living a happy turtle life. (Hey, it COULD have happened.)  

In the meantime, I'm having dreams about the turtle living in the park and mating with a painted turtle and making turtle babies that crawl up and down the playground equipment. Yes, I did dream that. It must all come back to that the turtle came into my life during Kelly's baby shower. 

I love you, Kelly, but I have to confess, I hate your turtle. (And, I hope this makes you laugh.) Even if he does make a good story. (And by the way, this 20 pound turtle became about 500 pounds in my legendary story telling about him. I'm quite a good exaggerator, believe me.)

So, that's the story of my nemesis... the snapping turtle. Maybe you all should just make the raspberry lemonade bars and call it a day. 

Thursday, April 19, 2012

Recipe Box: Lemon Meringue Cupcakes

So, I'm lazily playing catch up on my blog...So, for fun, here is a recipe for these awesome cupcakes I made for Easter brunch. They are putzy, but if you like lemon, oh so worth it!

Lemon Meringue Cupcakes (Taken from Serious Eats

My Easter cupcakes!
Makes 24 cupcakes, active time 1 hour, 30 minutes, total time 4 hours, 30 minutes

Ingredients

    For the Lemon Curd
    1 cup sugar
    4 large eggs, at room temperature
    3 large egg yolks, at room temperature
    1/8 teaspoon salt
    2 tablespoons zest and 3/4 cup juice from 3 large lemons
    8 tablespoons unsalted butter, cut into small pieces
    
    For the Lemon Cupcakes
    Baking spray
    1 3/4 cups sugar
    2 tablespoons finely grated zest and 1/4 cup juice from 2 large lemons
    1 1/4 cups all-purpose flour
    1 cup cake flour
    2 teaspoons baking powder
    1 teaspoon baking soda
    3/4 cup milk, at room temperature
    1 teaspoon pure vanilla extract
    4 large eggs, separated and at room temperature
    1 teaspoon salt
    2 sticks (8 ounces) unsalted butter, at room temperature
    
    For the Meringue Topping
    1 1/4 cups sugar
    1/4 cup water
    1/4 cup light corn syrup
    6 large egg whites, at room temperature
    1/4 teaspoon salt


Procedures

    For the Lemon Curd: Whisk sugar, eggs, egg yolks, and salt together in a medium heavy-bottomed saucepan. Add lemon zest and lemon juice and cook over medium heat, whisking constantly, until thickened and the consistency of pudding, 8 to 10 minutes.

    Strain curd into medium bowl. Add butter and stir until completely incorporated. Place a piece of plastic wrap directly on the surface of curd and refrigerate until completely chilled, about 2 hours. Alternatively, place bowl in ice bath and stir constantly until custard is completely cooled, 10 to 15 minutes. Place plastic wrap directly on surface of curd and refrigerate until needed. (Curd may be prepared up to 2 days in advance).

    For the Lemon Cupcakes: Place 24 cupcake liners in 2 (12-cup) baking tins. Lightly coat tins and liners with baking spray. Adjust oven racks to upper middle and lower middle positions and preheat oven to 350°F.

    In food processor, pulse1 1/2 cups sugar and lemon zest until no zest strands remain.

    Whisk all-purpose flour, cake flour, baking powder, and baking soda together in medium bowl; reserve.

    Combine milk, lemon juice, and vanilla in glass measuring cup (mixture will curdle); reserve.

    In large, clean, dry bowl, whip egg whites and salt with whisk attachment on medium speed until soft peaks form, about 2 minutes. Gradually add remaining 1/4 cup sugar and continue whipping until stiff peaks form, 1 to 2 minutes longer. (If you used the stand mixer bowl, transfer whites to separate bowl).

    Beat butter and lemon sugar with paddle attachment on medium speed until light and fluffy, about 2 minutes. Add egg yolks, one at a time, beating well after each addition. Add flour mixture in three batches, alternating with milk mixture.

    Stir in 1/3 of egg whites, then, fold in remaining egg whites with rubber spatula. Divide batter equally between prepared pans, filling each cup about 3/4 of the way.

    Bake until tester inserted in center of cupcakes comes out clean, 20 to 25 minutes, rotating and alternating pans halfway through baking.

    Transfer tins to cooling racks and cool 10 minutes in pans. Turn cupcakes out directly onto racks, then invert so the tops are facing up. Cool completely, about 30 minutes

    For the Meringue Topping: Stir sugar, water, and corn syrup in heavy-bottomed medium saucepan over medium-low heat until sugar dissolves. Increase heat to medium-high and boil syrup until it registers 238°F on candy thermometer, 8 to 10 minutes.

    While syrup boils, in large, clean, dry bowl, whip egg whites and salt with whisk attachment on medium speed until soft peaks form, about 2 minutes. With mixer running on medium-high speed, add syrup to egg whites in a slow, steady stream. Beat until outside of bowl is cool to the touch and whites are thick and glossy, about 7 minutes.

    Transfer meringue to a pastry bag fitted with a 1/2-inch pastry tip. Alternatively, transfer meringue to a gallon-sized zipper-lock bag and cut off a 1/2-inch from the tip.

    To Assemble: Once cooled, cut out circles in center of cupcakes, leaving about a 1/2-inch border around. The cutout will look like a cone. Lift the “cone” from the cupcake and trim off the pointy part to make a coin-like cap.

    Fill each cupcake with curd and cover center with cap.

    Pipe meringue onto cupcakes, smoothing out sides or making peaks decoratively. Brown meringues with torch. (If you don’t have a torch, heat broiler. Arrange frosted cupcakes on a baking sheet, 6 at a time and run under the broiler until browned, 10 to 30 seconds, depending on the broiler). Serve.

© Serious Eats

Tuesday, October 18, 2011

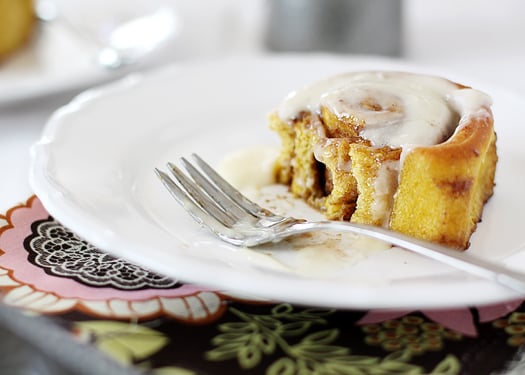
Recipe Box: Pumpkin Cinnamon Rolls

Tonight I got in the mood for fall baking. I've been in the mood for pumpkin-flavored fall treats. To kick off the craving, I made a batch of pumpkin cinnamon rolls, which I found on one of my favorite baking blogs, Baked Bree.

They are in the kitchen rising now. I can't wait to taste one! I am so confident that they will be delicious that I'm sharing the recipe even before trying one myself. (Original recipe taken from Good Life Eats blog).

Watch for more from me soon-- I bought six cans of pumpkin pie filling at the grocery store tonight!


Pumpkin Cinnamon Rolls with Cream Cheese Icing

roll dough adapted from King Arthur Flour
makes approximately 15-16 rolls
Print Save Recipe

Ingredients:

Roll Dough:
1/4 cup warm water (not hot, about 110 degrees)
1 package (2 1/4 teaspoons) active dry yeast
1/3 cup warm milk
1 large egg, beaten
3/4 cup pumpkin puree, either fresh or canned
tablespoon melted butter
2 cups (approximately) All-Purpose Flour
1 1 /4 cup Whole Wheat Pastry Flour
1/2 cup brown sugar
1 teaspoon salt
3/4 teaspoon cinnamon
1/4 teaspoon ground ginger
1/4 teaspoon ground cardamom
Filling:
1 stick butter
2/3 cup white sugar
1/4 cup brown sugar
2 teaspoons cinnamon
1/2 teaspoon each of allspice and ginger
1/4 teaspoon nutmeg
1/8 teaspoon cloves
Cream Cheese Frosting:
4 ounces cream cheese
1 stick (4 ounces) butter, softened
1 teaspoon vanilla extract
3/4 teaspoon lemon juice
2-3 cups powdered sugar

Directions:

Stir yeast into water to soften in a large bowl. Allow to rest for 5 minutes before stirring to combine. Stir in the milk, eggs, pumpkin, butter, 1 1/4 cups whole wheat flour, brown sugar, salt, cinnamon, ginger and cardamom to yeast mixture. Beat vigorously for 2 minutes.
Slowly add the rest of the flour (all purpose), a bit at a time, until the dough is stiff enough to knead. Begin with 1 1/2 cups of flour and increase if necessary. Turn dough out onto a floured surface. Knead, adding flour as necessary, until you have a smooth, elastic dough.
Place the dough into a greased bowl. Turn the dough in the bowl to coat the entire ball of dough with oil. Cover with plastic wrap and rise until doubled, approximately 1 hour.
Combine the white sugar, brown sugar, cinnamon, allspice, ginger, nutmeg and cloves in a another bowl, set aside. Transfer the risen dough to a lightly greased work surface, and pat or roll it into a 16" x 12" rectangle. Spread softened butter over dough and then sprinkle with the sugar mixture.
Roll the dough into a log the long way; it'll stretch to about 20" long as you roll. Using a very sharp knife, slice the log into 15 slices. In order to cut down on drag, it helps to rinse the blade in hot water, and wipe it off, between slices. Place slices in a greased 9x13 inch baking pan (or in two 8 or 9 inch round cake or pie pans). Cover with a towel and let rise until almost doubled, about 45 minutes.
Bake in a preheated 375°F oven. Bake the rolls till they're brown around the edges and beginning to turn golden brown across the center, about 20-30 minutes.
While rolls bake, prepare the cream cheese frosting. Add the cream cheese, butter, vanilla, and lemon juice to a small food processor. Blend until smooth and combined. Add the powdered sugar 1/2 cup at a time, blending in between, until well mixed and desired consistency is reached. (I used 2 cups powdered sugar)
Frost warm rolls with the cream cheese frosting and serve immediately.
For night before prep: Prepare the rolls up to the point where you roll and place in the pan. Then, cover in plastic wrap and refrigerate overnight. In the morning, remove the pan from the fridge and proceed with the instructions where you left off. Rising time may be slightly longer than noted in the recipe due to the dough being cold vs room temp.

Friday, August 26, 2011

Recipe Box: Mint Cake!

I've realized that I haven't posted any recipes in awhile, something I've meant to do on my blog. While I aimed to make 30 recipes before 30, that honestly fell away. I think mostly because my time and attention were given to Lucy. (She takes a lot of both!)

So, I'm trying to get back to my blogging and am sharing a new recipe. For a friend's birthday in July, I made a family favorite, simply called "mint cake." It's very, very easy and very, very delicious. This is a super simple one. Enjoy!

Mint Cake

Ingredients:
One box of white cake mix
Bottle creme de menthe
Cool whip
Fudge ice cream topping

To prepare:
Prepare the white cake mix according to the box directions. (Or for those more culinary inclined, prepare white cake batter from scratch.) Add creme de menthe to the batter. I eyeball it, but about 1/8th cup is probably close. Bake the cake according to cake mix directions. Let cool. Add layer of fudge topping on top of the cooled cake. Mix creme de menthe into cool whip. Again, I eyeball it, but 2-3 tablespoons is probably about right. Spread the cool whip layer over the cake. Serve and enjoy!

Sunday, March 6, 2011

30 Dishes Before 30 : Recipe # 2: Hummus

I've been craving hummus lately. It's one of the dishes I put on my list to learn to make before my 30th birthday and since I'm kicking off this little experiment, I decided to make a batch today. I knew it would be one of the easier dishes to make on my list. And, of course, it was. It's simple and delicious and much more fresh than what I usually buy in the grocery store.

I kind-of threw my own recipe together as far as the seasonings went, based on reading a few various recipes online and in my Moosewood cookbook. The most interesting part of the process was finding the tahini (a ground sesame seed paste), which all hummus recipes call to include.

I went to a Mid-Eastern grocery store to find the tahini. Of course, they only accepted cash. And, of course, per usual, my cash was limited so I only had a dollar and some change to pay for the $2.99 item. I offered to go to an ATM and come back, but after having spent five minutes flirting with me and teaching me a recipe for shishkabobs, the gentleman at the check out took my dollar, quarter and handful of pennies in order to pay for my item as long as I promised to come back and tell my friends about his shop. So, out I went, feeling a bit weird, but like I had gotten a good deal on my first tahini purchase.

The recipe was good, and tasted like a standard hummus. I will say, though, I absolutely need my friend Lisa's hummus recipe, which is absolutely amazing. (Much better than my first attempt.) After I get that, I'll share her recipe because it's absolutely fabulous.

Happy snacking!

Monday, February 28, 2011

30 Dishes Before 30: Recipe #1: Chicken Cordon Bleu

My 30 Recipes before 30 challenge has officially begun!

Recipe 1: Chicken Cordon Bleu

I made my first new recipe for my personal challenge this weekend. My lovely friend Jillian was kind enough to brave my first new dish: chicken cordon bleu. I learned that chicken cordon bleu is extremely easy and quick to make. It was so easy, that I'm going to make it for myself for dinner again tonight because I have a little bit of the breading mixture left to use up.

With the new dish, I served a baked potato with dolled up sour cream (little dried onion and minced garlic for flavor), broccoli and a baguette served with olive oil and a delicious Parmesan garlic seasoning mix I bought from Pampered Chef. We also shared a bottle of chardonnay. (A dinner party is not a dinner part without wine!)

The recipe I used was from a favorite cookbook of many, The Joy of Cooking. This recipe I found on Food Network from Tyler Florence is nearly identical. (Of course, I don't think you're allowed to deviate too much to make chicken cordon bleu

Good things that came from my first 30 before 30 dish were:

  • I finally bought a meat tenderizer.
  • Now owning said meat tenderizer, I intend to cook a lot more stuffed chicken and pork chop recipes-- delicious!
  • I have no need to ever buy frozen chicken cordon bleu from the grocery store ever again.
  • I had a great dinner with a great friend who is always brave and gracious when it comes to my cooking.
  • We drank a lot of good wine with the dinner.
  • I got to play hostess. This I like.
So, dish one, I would count as a success. Thanks, Jillian, for being my first guest! I look forward to hosting several more parties between now and September!

Sunday, January 23, 2011

30 Dishes Before 30

I was reading several recipe blogs today, checking off lots of yummy things I could try to cook. While surfing the many delicious options available, I came across one blogger who was coming up with 30 dishes to make before she turns 30. I thought it was a great idea. And so I'm stealing it. In the next 8.5 months, my goal is to make 30 new dishes.

I've started a list today. The only rules I've made for myself is that the dishes have to be things I haven't made before. They also have to be homemade. And, finally they have to be shared and checked off on Myriad Musings so I am held accountable.

I've come up with a list of 48 potential items so far. I'd love more ideas for what one of my dishes could be. Some are main dishes, some are desserts, some are appetizers or side dishes. But, before I turn 30, I'll make 30 of these items. I welcome suggestions from any category.

Are you up for dinner on me? Send me a note, we'll make a dinner date. Because trying 30 new dishes before 30 requires dinner parties.

(Disclaimer: I don't plan to host 30 dinner parties. Some of these dishes may be made outside of a party setting. And my guess is that the parties I do host will include more than one of the dishes that are in my goal list.)

Dish List:

30 recipes to make before i turn 30- starting point
  1. roast a turkey
  2. pot roast
  3. loaf of bread
  4. homemade tomato soup
  5. souffle
  6. lemon meringue pie
  7. real hollandaise sauce
  8. chcolate mousse
  9. crem brulee
  10. homemade jam
  11. shepherd's pie
  12. pineapple upsidedown cake
  13. homemade hummus
  14. homemade naan bread (to go with an indian dinner)
  15. Jucy Lucy burger (homemade)
  16. chicken cordonblue (homemade)
  17. Coq Au Vin (stew)
  18. Bananas foster
  19. Baked Alaskan
  20. risotto
  21. homemade key lime pie
  22. minestrone soup
  23. arleth's swedish rye bread
  24. biscotti
  25. homemade donuts
  26. gazpacho (homemade)
  27. homemade lemon curd
  28. homemade nachos with the works
  29. crab cakes
  30. monkey bread
  31. french onion soup
  32. tiramisu
  33. goulash
  34. aioli
  35. ravioli (homemade)
  36. fondue
  37. sangria
  38. beef wellington
  39. homemade marshmallows
  40. homemade sausage
  41. pork carnitas
  42. calamari
  43. egg rolls
  44. pot stickers
  45. sherbert
  46. peanut brittle
  47. fudge (successfully)
  48. tamales

Sunday, January 9, 2011

Recipe Box: BBQ Turkey Chili

My sister just asked me for this recipe today so I thought I'd share it with others, too. This is a delicious and healthy recipe I got from my friend Natalie. It's also a really healthy option for those, like me, who've again set New Year's weight loss resolutions.

What I think makes it great is sprinkling a bit of fresh cilantro on top!

Natalie's BBQ turkey chili
  • 1-2 TBSP olive oil
  • 1-2 lb ground turkey (or beef)
  • 1 palmful grill seasoning (such as Lawry's)
  • 1/2 cup worcestershire sauce
  • 1 palmful chili powder
Brown the meat in the olive oil. Once browned, add the grill seasoning, chili powder and worcestershire sauce and mix. Then add:
  • 2 bell peppers, chopped (any color)
  • 1 cup corn
  • 1 onion, chopped
  • 2-4 (12-15 oz.) cans beans, drained (any type - I like to mix and match)
  • 2 tomatoes, chopped (or one can, drained)
  • 1 can tomato sauce (12-15 oz.)
  • 1/2-1 bottle beer (any type, but I prefer medium to dark)
  • 1 cup BBQ sauce
Mix and let simmer for an hour or two (or whatever you have time for. It does, however, get better with age.) Serve with chips or cornbread, sour cream and freshly chopped cilantro (cilantro can also be added to chili towards the end of cooking time).

Wednesday, December 15, 2010

Recipe Box: The Heavyset Cheese Ball

I discovered this recipe last Christmas as I was seeking an appetizer recipe to bring to our work holiday party. It turned out gorgeous and tasted great. In short, it was a real hit! Thank you Amy Sedaris!

The Heavyset Cheese Ball on the Food Network

The Heavyset Cheese Ball
Recipe courtesy Amy Sedaris

Prep Time:15 minInactive Prep Time:8 hr 0 minCook Time:20 min
Level: Easy
Serves: 8 servings

Ingredients
1 1/4 cups whole natural almonds
1 (8-ounce) package of cream cheese
1/2 cup real mayonnaise
3 crispy cooked bacon slices, crumbled
1/2 teaspoon dill weed
Salt and pepper
1 tablespoon chopped green onion
Sprigs, for garnish
Directions
Preheat oven to 300 degrees F.

Place and spread all the almonds on a cookie sheet or in a shallow pan, pushing the almonds around until they turn color, about 20 minutes.

Mix together the cream cheese and the mayonnaise. Add the bacon, salt and pepper, dill, and onion. Chill overnight.

On a serving platter, make 2 pine cone shapes with the cheese. Begin to press the almonds at a slight angle into the cheese, starting at the narrow end of the pine cone shape.

Do this in rows, continuing to overlap rows until all the cheese is covered. Garnish with fake sprigs, or real ones, or with rosemary.

Serve at room temperature and spread on crackers.

Friday, December 10, 2010

Christmas Cookie Baking

Tomorrow my sister and I will go to a Christmas cookie exchange at one of my good friend's homes. We have to make 6-8 dozen cookies each.

Erin didn't have much time to think about cookies, but because I am signed for for several e-mail recipe lists, and tis the holiday season, a few new cookie recipes have found their way to my e-mail inbox. I found a few that looked enticing including these two that we'll be baking:
Here are the recipes for those who are interested:

Slice-and-Bake Lemon Shortbread
  • Makes 36 cookies
  • Hands-on Time: 30m
  • Total Time: 5hr 00m
Ingredients
  • 3 cups all-purpose flour, spooned and leveled
  • 1/4 teaspoon kosher salt
  • 1 cup (2 sticks) unsalted butter, at room temperature
  • 3/4 cup granulated sugar
  • 1 teaspoon finely grated lemon zest
  • 1 teaspoon pure vanilla extract
  • coarse sanding or turbinado sugar for sprinkling
Directions
  1. In a medium bowl, whisk together the flour and salt.
  2. Using an electric mixer, beat the butter, granulated sugar, lemon zest, and vanilla on medium speed until fluffy, 2 to 3 minutes. Reduce speed to low and gradually add the flour mixture, mixing until the flour is incorporated (dough will be crumbly but will hold together when squeezed in the palm of your hand).
  3. On a piece of parchment, form the dough into a rectangular block, 12 by 2 by 1 inches (use a ruler or metal spatula to square off the sides). Wrap in the parchment and refrigerate until firm, about 3 to 4 hours.
  4. Heat oven to 350° F. Cut the dough into ⅓-inch-thick slices and place on baking sheets spaced 1 inch apart; sprinkle with the coarse sugar.
  5. Bake, rotating the baking sheets halfway through, until the edges begin to brown, 12 to 15 minutes. Cool slightly on the baking sheets, then transfer to wire racks to cool completely. Store the cookies in an airtight container at room temperature for up to 7 days.
Tip

The dough can be frozen in a rectangular block, tightly wrapped, for up to 3 months. Let thaw until soft enough to slice; bake as directed, adding 2 to 3 minutes baking time.

Nutritional Information

Serving Size: 1 cookie, Calories 104; Calories From Fat 46; Fat 5g; Sat Fat 3g; Cholesterol 14mg; Sodium 14mg; Protein 1g; Carbohydrate 13g; Sugar 6g; Fiber 0g; Iron 0mg; Calcium 3mg
Advertisement

Red Velvet Rich and Creamy Cookies
Prize-Winning Recipe 2010! Create rich and dreamy cookies reminiscent of the classic red velvet cake.

Note: I consider using pre-made Betty Crocker® sugar cookie mix (see below in recipe) to be cheating and taking away half the fun, so I'll be making my own sugar cookie dough then adding the remainder of the ingredients to the mix to make my Red Velvet Cookies. However, for the sake of not screwing up someone else's kitchen, I've just listed the recipe as it appeared from Betty Crocker.

Prep Time: 1 hr:10 min
Total Time: 1 hr:10 min

Makes: 36 cookies
  • 1 pouch (1 lb 1.5 oz) Betty Crocker® sugar cookie mix
  • 1/3 cup unsweetened cocoa
  • 1/4 cup butter or margarine, softened
  • 1/4 cup sour cream
  • 1 tablespoon red food color
  • 1 egg
  • 3/4 to 1 cup Betty Crocker® Rich & Creamy cream cheese frosting
  • 1/4 cup chopped nuts
Preparation:

Heat oven to 375°F. In large bowl, stir cookie mix, cocoa, butter, sour cream, food color and egg until soft dough forms.
  1. Roll dough into 1-inch balls; place 2 inches apart on ungreased cookie sheet.
  2. Bake 8 to 9 minutes or until set. Cool 2 minutes; remove from cookie sheet to wire rack. Cool completely, about 15 minutes.
  3. Frost cooled cookies with frosting. Sprinkle with nuts. Store tightly covered at room temperature.
Nutrition Information:
1 Serving (1 Cookie): Calories 100 (Calories from Fat 40), Total Fat 4 1/2g, (Saturated Fat 1 1/2g, Trans Fat 1g), Cholesterol 10mg; Sodium 65mg; Total Carbohydrate 15g (Dietary Fiber 0g, Sugars 9g), Protein 1g; Percent Daily Value*: Calcium; Exchanges: 1/2 Starch; 0 Fruit;1/2 Other Carbohydrate; 0 Skim Milk; 0 Low-Fat Milk; 0 Milk;0 Vegetable; 0 Very Lean Meat; 0 Lean Meat; 0 High-Fat Meat; 1 Fat; Carbohydrate Choices:1;*Percent Daily Values are based on a 2,000 calorie diet.


Thursday, December 2, 2010

Recipe Box: Butternut Squash Flat Bread

Recipe Source: Real Simple Food and Recipes

Serves: 4

To find: Butternut Squash Flat Bread Recipe

Ingredients

Directions

  1. Heat oven to 425° F. Shape the dough into a large oval and place on a cornmeal-dusted baking sheet.
  2. In a large bowl, toss the squash, onion, pine nuts, thyme, 1 tablespoon of the oil, ½ teaspoon salt, and ¼ teaspoon pepper.
  3. Scatter over the dough and sprinkle with the cheese. Bake until golden brown and crisp, 20 to 25 minutes.
  4. Toss the arugula with the remaining tablespoon of oil and ¼ teaspoon each salt and pepper. Serve with the flat bread.
Suggested Variations:
  • Cut the squash in half, add chicken.
  • I did a mix of half white cheddar and half extra sharp cheddar. This was mostly just to use up some white cheddar, but gave it a delicious zest too.
  • Pine nuts I'd consider optional. They are expensive and unless you really like pine nuts, they don't add much to the recipe. Other nuts could be tried for crunchiness.
  • Bacon bits would be a delicious addition, too!